Exposing development environments over HTTPS using Cloudflare Tunnels
At some point, the majority of developers will run into a scenario where they’re looking to add automation tests to a payment gateway on their website - this requires two things, usually for callbacks/webhooks:
- Dealing with port-forwarding, which is something that no IT or DevOps team want to get involved with for everyone’s home network.
- Getting publicly trusted certificates on everyone’s device, since no payment gateway is going to talk to you over plain HTTP.
How do we handle this challenge? Cloudflare Tunnels! Tunnels provides us with encrypted, outbound egress to Cloudflare so there is no need to deal with NAT or port forwarding as well as allowing us to leverage Universal SSL to make sure that all developers have a publicly trusted certificate available on their public hostname.
Worried about possibly sensitive information being public? You could also take advantage of Cloudflare Access to protect the environment behind Single Sign-On with your chosen identity provider whilst supporting automated traffic using service tokens.
Initial setup
First things first, you are going to need a website onboarded onto Cloudflare and set yourself up for the free plan of Cloudflare and Cloudflare Zero Trust. Take a look at prerequisities.
You can use ad-hoc Quick Tunnels without an account but these come with no support/uptime guarantees and will come with a different hostname everytime.
As a step in our onboarding process, we’ll setup a tunnel, associated DNS records & provide the developer with the credentials file necessary to utilise that tunnel.
This is all done through the cloudflared utility, the command-line client & daemon for configuring and running tunnels.
cloudflared configuration
All of the configuration from this point onwards will be done within the cloudflared utility - this will involve creating a tunnel, setting up the DNS records and also running the tunnel.
This means that you will need to be authenticating cloudflared using an account with the appropriate permissions to make those changes, such as the Super Admin or Admin roles.
Step 1. Authenticate cloudflared
This one is nice and easy - just run cloudflared login and follow the prompt.
$ cloudflared loginA browser window should have opened at the following URL:
https://dash.cloudflare.com/argotunnel?callback=snip
If the browser failed to open, please visit the URL above directly in your browser.
Select the website that you’re going to be using and then click on Authorize - you should then get a confirmation in your terminal.
2022-07-28T13:38:19Z INF Waiting for login...You have successfully logged in.If you wish to copy your credentials to a server, they have been saved to:/home/kian/.cloudflared/cert.pemThe generated cert.pem is the ‘account certificate’ that gives cloudflared access to an account-wide scope. This is only required if you’re setting up tunnels for others, since you will provide users with a single JSON file that holds the credentials for their specific tunnel and nothing else. Keep it safe!
Step 2. Tunnel setup
There’s two distinct steps here - creating the tunnel and creating the relevant DNS records.
The name that you associate to the tunnel is just for your own organisation - feel free to name it whatever you want, such as local-dev-{name}.
$ cloudflared tunnel create -o json local-dev-kian{ "id": "3491c1ed-6a97-49a6-bd56-e56272d5e2df", "name": "local-dev-kian", "created_at": "2022-07-28T13:43:55.358928Z", "deleted_at": "0001-01-01T00:00:00Z", "connections": [], "token": "snip"}The id shown here is the id of the tunnel - which we’ll need to find the tunnel credentials. By default, cloudflared will put them in ~/.cloudflared/{id}.json. In this case, give 3491c1ed-6a97-49a6-bd56-e56272d5e2df.json from that folder to the user who you are provisioning this tunnel for.
$ cloudflared tunnel route dns local-dev-kian local-dev-kian.kian.org.uk2022-07-28T13:47:40Z INF Added CNAME local-dev-kian.kian.org.uk which will route to this tunnel tunnelID=3491c1ed-6a97-49a6-bd56-e56272d5e2dfcloudflared tunnel route dns takes two arguments, a tunnel name or ID and the hostname that you’d like to route to the aforementioned tunnel. In our case, I want my tunnel to be available at local-dev-kian.kian.org.uk.
Step 3. Using the tunnel
With the 3491c1ed-6a97-49a6-bd56-e56272d5e2df.json file from step 2 placed into the ~/.cloudflared/ folder, we’re ready to to go - just need to configure the tunnel.
Create a ~/.cloudflared/config.yaml file and just add the tunnel’s id into the tunnel key.
tunnel: 3491c1ed-6a97-49a6-bd56-e56272d5e2dfNow we just run cloudflared tunnel run, passing in the local service that we want to expose (i.e localhost:8080) and we’re done!
$ cloudflared tunnel run --url localhost:80802022-07-28T13:57:07Z INF Starting tunnel tunnelID=3491c1ed-6a97-49a6-bd56-e56272d5e2df2022-07-28T13:57:07Z INF Version 2022.7.12022-07-28T13:57:07Z INF GOOS: linux, GOVersion: go1.17.10, GoArch: amd642022-07-28T13:57:07Z INF Settings: map[url:localhost:8080]2022-07-28T13:57:07Z INF cloudflared will not automatically update if installed by a package manager.2022-07-28T13:57:07Z INF Generated Connector ID: 4362ff9d-6e5e-4dc5-bec3-1545f7535bce2022-07-28T13:57:07Z INF Initial protocol quic2022-07-28T13:57:07Z INF Starting metrics server on 127.0.0.1:42461/metrics2022/07/28 14:57:07 failed to sufficiently increase receive buffer size (was: 208 kiB, wanted: 2048 kiB, got: 416 kiB). See https://github.com/lucas-clemente/quic-go/wiki/UDP-Receive-Buffer-Size for details.2022-07-28T13:57:08Z INF Connection 413f5aaa-cbfc-4907-870c-91dfa659bad4 registered connIndex=0 ip=198.41.200.113 location=MAN2022-07-28T13:57:08Z INF Connection d863ccd8-ad57-4bc8-a185-7c3755d0d871 registered connIndex=1 ip=198.41.192.27 location=LHR2022-07-28T13:57:09Z INF Connection 7269df51-cff5-4a58-841e-1868d0217e3b registered connIndex=2 ip=198.41.200.53 location=MAN2022-07-28T13:57:10Z INF Connection f981da2d-5f2c-4670-81b2-bbe7ce1d0872 registered connIndex=3 ip=198.41.192.47 location=LHRDone!
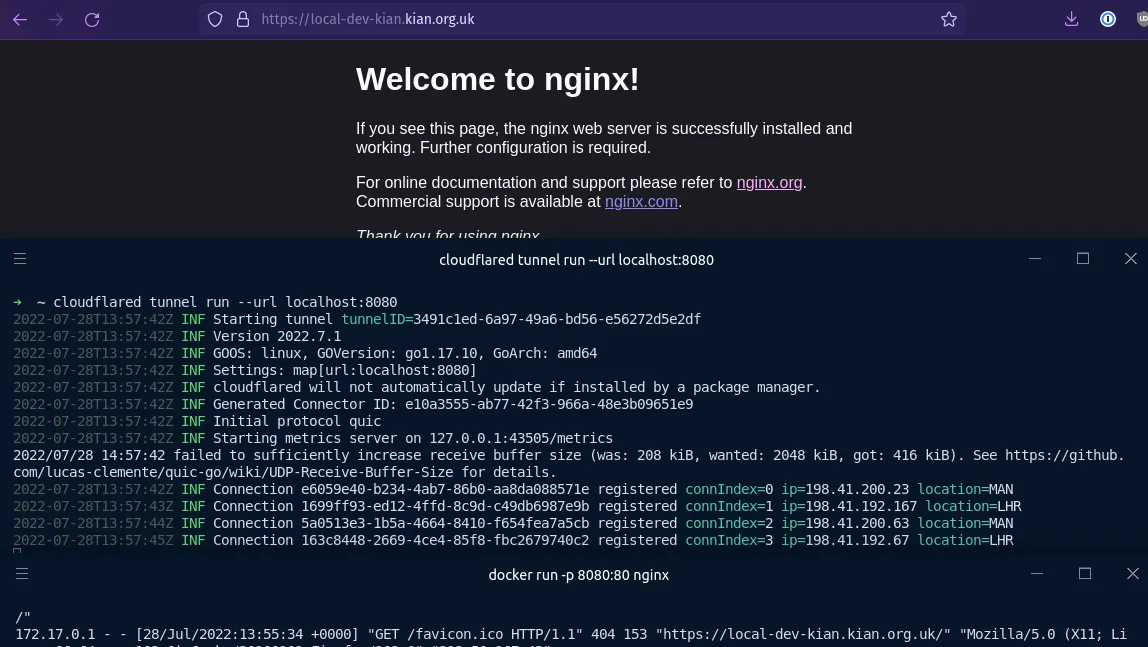
We’ve got our local services exposed publicly & securely over HTTPS, using a free certificate from Cloudflare! How much did it cost us: £0.